December 13, 2021

Case Me a Christmas Card with Michelle Luptin

I am so excited today to be guesting with my friend Michelle Lupton for her Case Me a Christmas Card event! 

I chose a card that Michele made in September with beautiful ink blending. I made my Christmas version with a twistI made a tag! I ink blended Distress Oxide inksCracked Pisachio, Salvaged Patina, Peacock Feather and Blueprint Sketch. with the large Snowflake stencil from Studio Katia. I also blended my sentiment (now disconinued) from Birch Press Design with the same colours.


Of course I had to finish it off with some silver cord and jingle bells.


This is Michelle's card I chose to case...


Let's go have a look to see which one of my cards that Michelle chose to caseclick HERE.


WFC2112 Challenge Guest Design

Hi friends, thanks for stopping by today. 
I'm super excited to share with you that I'm guest designing with Waffle Flower Crafts for the Waffle Flower Monthly Challenge!


One of my favourite things to do with a friend for their birthday is go out for coffee. The pandemic has made that a bit trickier, especially in the winter. Putting on a scarf and meeting a friend outdoors for coffee is a safe way to celebrate their special day!


I created a background using Distress Oxide inks in Tumbled Glass, Peacock Feather and Salvaged Patina. 

After it was dry I stenciled the Snowflake Background stencil with white pigment ink. It is a very subtle background but it is so soft and pretty. The sentiment was made using two stamp sets--Cozy Holiday Sentiments and Big Dots Sentiments. A little stamp surgery and I was able to create my own winter birthday sentiment which I white embossed.


I added to snowbanks to create the rest of the scene. I blended a panel of Twisted Citron and Lucky Clover Distress Oxide ink to cut my evergreens using the Nesting Christmas Tree die. Then I stamped images from the Hamster Family set and die cut them with the co-ordinating Hamster Family dies! I used Liquid Applique to create the fuzzy ear muffs and added the images with a combination of glue and foam tape. The card was finished it off with a few iridescent jewels for sparkle and its done!


I hope to see you participate in this month's challenge for your chance to win!
Thanks for stopping in today!


December 10, 2021

12 Tags of Christmas 2021


Hi friends, today I'm super excited to be guesting with my friends at Ellen Hutson for Day 10 of the 12 Tags of Christmas 2021 event! Of course you all know how much I love making Christmas tags! 


Today's tag is inspired by the Christmas Carol The 12 Days of Christmas. For my tag I created a stocking filled with 12 presents, one for each of the 12 days and presents that are a bit more affordable the gifts given to their true love in the song! 

Starting off I stamped the stocking from the Sweet Surprises set with VersaMark ink on red cardstock and embossing it with Wow Metallic Gold Rich embossing powder. I used the Sweet Surprises dies to cut the stocking out. All 12 gifts were stamped and gold embossed on a variety of coloured cardstock using images from Sweet Surprises and the Holiday Sprigs sets. The little bear was stamped in black and clear embossed. 

All the tiny images were die cut with the Sweet Surprises dies and Holiday Sprigs dies. I cut the round tag from the Farmhouse Tags die set with white cardstock and gold embossed some stars from the Holly Jolly Chirstmas set. The red stocking was attached to the tag and embellished with tiny gold jingle bells tied on with my favourite May Arts metallic gold string. This is my go to string for tag making.


Supplies Used:

Sweet Surprises set
Sweet Surprises dies
Holiday Sprigs set
Holiday Sprigs dies
Holly Jolly Chirstmas
Holly Jolly Christmas dies
Farmhouse Tags dies
Wow Metallic Gold Rich
May Arts metallic gold string

Click here to view the entire Ellen Hutson Winter and Christmas Release

I was teamed up with Design Ambassador Emily Leiphart for today, head over to the Ellen Hutson blog to see her tag. Also on the blog are all the details on how you can have a chance to win a shopping spree at Ellen Huston!

Thanks for stopping in today!


December 1, 2021

Color Hues #31

It's time for a new color another challenge at the Color Hues! I hope you join us for Color Hues #31! 

I created my own coloured cardstock by ink blending Distress Oxide inks on to a panel of Bristol Smooth. I used Abandoned Coral, Candied Apple and Festive Berries for the red panel which I stamped and embossed using I used with Pretty Pink Posh Poinsettias stamp set. Then I made a second green panel using Mowed Lawn, Pine Needles and Lucky Clover. I spritzed both panels with water and splattered some watered down white acrylic paint.

I glued the flowers and leaves to a white panel using tape runner and foam tape. A sentiment was added from Pretty Pink Posh Christmas Friends and I finished off my card by adding some gold sparkle jewels.


I can't wait to see what you make for this challenge!


November 16, 2021

Color Hues #30

It's time for a new color another challenge at the Color Hues! I hope you join us for Color Hues #30! 


I have been waiting for just the right opportunity to use the Concrod & 9th Full of Joy Tri Fold dies and this colour duo is perfect. I cut the large die with a matt gold cardstock. Then I cut the bottom of the die off so that I could centre mount it on my card and not use it as a flip up. I cut the smaller detail letters with silver sparkle cardstock and glued them on--it look's so amazing! I wish you could see it, gold and silver are so hard to photograph! 

My background was made from the Concord & 9th Pinstripe Background stamp set. I added the Joy piece to the card with foam tape. The sentiment `To the World`is from the Full of Joy stamp set white embossed on black. I added the finished sentiment with a combination of liquid glue and foam tape so it would be flush with the large joy!

Can`t wait to see what you make for the challenge!

November 12, 2021

Where are the 25 Days of Christmas Tags...this year!


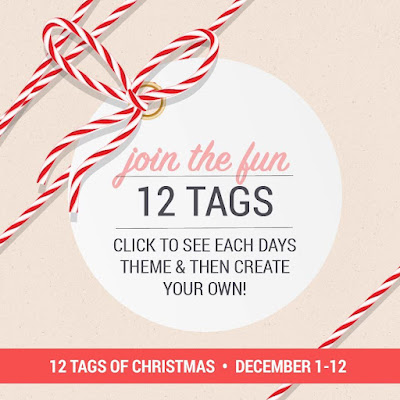
Hello my friends. I have received so many messages recently from many of you wondering if I was going to be hosting the event again this year.

After doing it for 10 wonderful and successful years I decided last December that it was a good time to wrap it up. That doesn't mean that I won't do it again, but it does mean that I needed a break. It was so much fun, but also very time consuming and by the time it was over and prizes were distributed I was scrambling to get my own Christmas cards and projects completed.

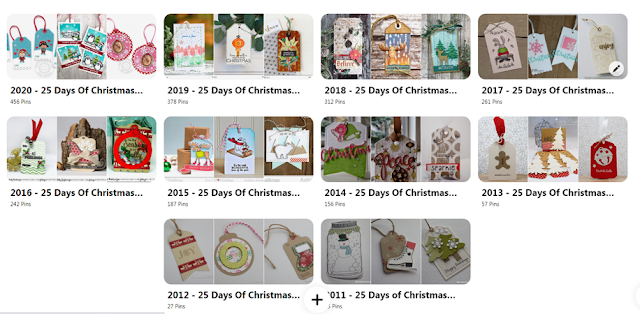
Yes, I could have started earlier on my own personal Christmas crafting but if you know me? I am a master pro-CRAFTINATOR! Over the course of this month I will be doing a few special posts because there is 10 amazing years of inspiration posts.

Any time you want to go back and have a look at all the blog posts with links to all 10 years click HERE, that is 250+ posts on my blog!

If that is a little too overwhelming for you, I have all the tags on individual Pinterest boards grouped by year HERE!


Now lets not forget all that you the readers contributed! I had a linkup for you to participate for prizes the last four years and they are still on my blog, all 

4034

Those can be found by reviewing the link up pages HERE

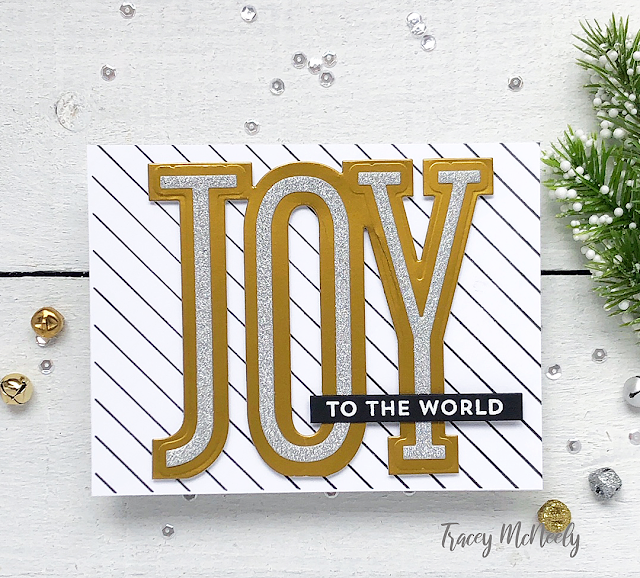
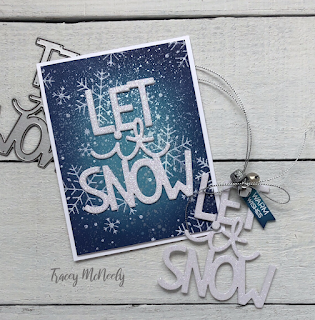
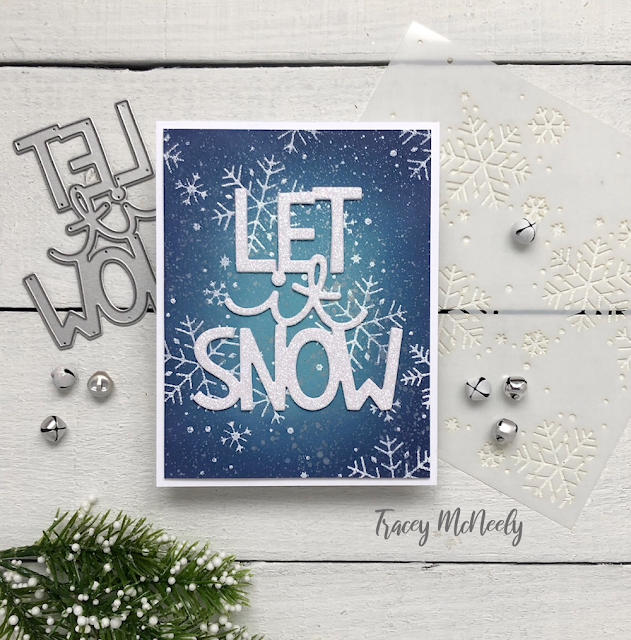
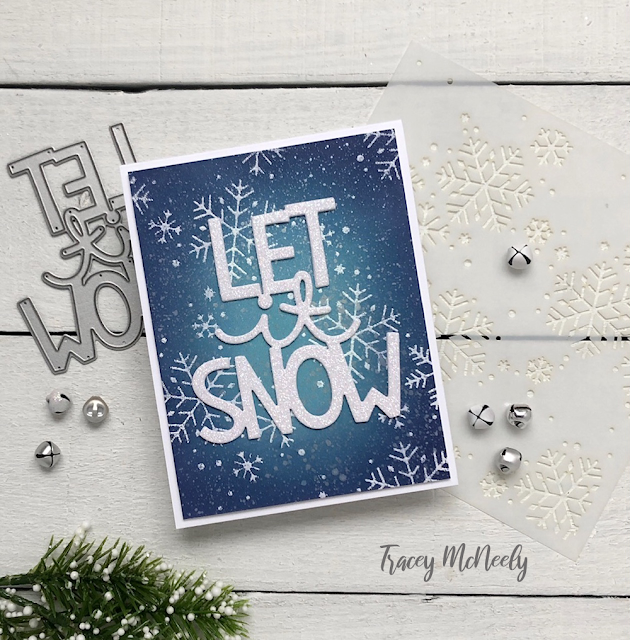
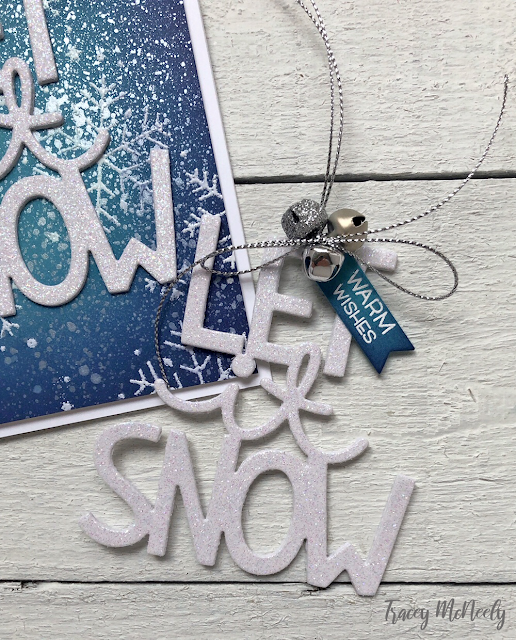
So I leave you with SO MUCH AMAZING INSPIRATION for Christmas Tags!
I hope it is all you need to get going on your own tags for this year!

Have a wonderful weekend and hope the weather is lovely where you are. Stay tuned for some more fun posts!!


November 5, 2021

Lawn Fawnatics Challenge #112


Happy Friday friends!

I have been busy working on lots of holiday crafty projects, but right now most the most important are Christmas/holiday cards. When I saw the new Lawn Fawnatics Challenge was Make the Sentiment the Star I knew I wanted to use the new Lawn Fawn Giant Let It Snow die.


I created an embossed background using one layer from the Lawn Fawn Snowflakes stencil and an watermark ink pad. I lay the stencil over a 5 1/2" x 4 1/4"" panel of Bristol Smooth cardstock where I wanted my snowflakes to be. I flipped it over and taped the stencil to the back of the panel. Then I flipped it back so that the stencil is on top. It's not necessary to do it this way, this is just the way I prefer to do it.

I prepped the panel well before embossing  using an embossing buddy. Then I pressed the watermark ink pad right onto the stencil until I covered my whole panel. I carefully removed the stencil, because it is a bit juicy, and I was left with the snowflake images from the stencil embossed with watermark ink. I sprinkled the panel with white embossing powder leaving me with a panel I could ink blend. I used Distress Oxide inks--Salvaged Patina, Peacock Feathers and Chipped Sapphire. The panel was trimmed down to 5 1/4" x 4".

I cut the Lawn Fawn Let It Snow die 4 times from white heavyweight cardstock and once from Lawn Fawn Pixie Dust cardstock. I glued all the layers together and added it to the snowflake panel with liquid glue. I added the panel to a white top folding card base with foam tape.


Now you know I couldn't have a card with a tag!


I made the sentiment that same way--4 layers of white heavyweight cardstock and a Pixie Dust layer on top! The tag was cut using the Lawn Fawn Scalloped Gift Tag. I tied a cluster of silver bells--mat, shiny and sparkly with silver metallic cord.

Thanks so much for stopping in today, have a fabulous weekend!


November 4, 2021

Ellen Hutson Guest Design

Hi there friends! I'm really excited to be posting again over on the Ellen Hutson blog! I'll be revisiting products from the most recent Essentials by Ellen Winter and Christmas Release, which is available for purchase at Ellen Hutson!


One of my favourite things to do with a stamp set that contain individual images of foliage is make it work to create a wreath, regardless of the season! Today each of my cards will have a wreath that I made using different branches from the Holiday Sprigs stamp set and the co-ordinating Holiday Sprigs designer dies. The first card feels a little more traditional and elegant where the second is a bit more artsy!


I usually begin a design by drawing a quick sketch of what I want to do, or in the case for this card I made a sample to make sure that my idea would actually work. Some days the recycle bin is full, and some days it’s back to the drawing board. The sample is usually quite messy by the time I’m finished with it, and there have been occasions when my sample turns out better than the finished product. Does that ever happen to you? My sample usually becomes an integral part of the overall creative process and before it hits the recycle bin for the last time it’s usually covered with stamping, embossing, Copic marker, inks and most times illegible scrawls—lol!

 Once I knew that my design was going to work I went ahead and made my wreath base using the pine branch from the Holiday Sprigs stamp set. I cut a 5 ¼” x 4” panel of cardstock and used the Essentials by Ellen Circle Designer Dies to create a circle in pencil where I want to put my wreath. I used a 3” circle die and lightly traced around the outside of it with a pencil. The branches and embellishments typically cover the pencil lines pretty well so usually there isn’t a need to erase.

 With my magic bag I rubbed it over my panel well so that I didn’t end up with embossing powder where it’s not meant to be. Now this is where I go a little wild and I freehand stamp the wreath using a watermark ink pad and an acrylic block, no MISTI. I embossed the wreath with Hero Arts gold embossing powder.


A sentiment from the Holly Jolly Christmas stamp set was masked, stamped and embossed with WOW Bright White Opaque embossing powder on red cardstock and then added to the card with foam tape.

 TIP: Use your magic bag for more than just embossing powder to keep the surface slick. Your embossing bag helps prevent other powders and glitter from sticking to everything.

 I added a few gold sparkle jewels in various sizes on and around the wreath. Then I dotted a ZIG Squeeze & Roll 2 Way Pen around the outside of the wreath and sprinkled Studio Katia Gold Fever Glitter over the card. Just the right amount of sparkle!


For my second card I used the mistletoe branch from the Holiday Sprigs stamp set to create a die cut wreath.


Just like the first card I created a pencil circle for my wreath shape but this time a bit higher up on the panel. This was so I would have enough room to put a sentiment below the wreath. I stamped the outline mistletoe branch 8 times using black ink. Then I stamped the co-ordinating solid image over top using Concord & 9th Evergreen ink. Using the Holiday Sprigs dies I cut the branches. The dies for this set are so easy to line up with the stamped images! That is such a game changer for me.

Working clockwise, I started building my wreath by adhering the mistletoe branches one at a time to the pencil line using my favourite Nuvo Deluxe Adhesive liquid glue. I tucked the stem of the next branch under to top leaf of the bough to give it a little dimension. I used 8 branches for my simple wreath but you could add as many branches as you would like for a fuller wreath.


 Once the wreath was complete I added some berries from Holiday Sprigs. They were stamped on white cardstock and cut with the Holiday Sprigs I tucked a few of them along the wreath and then added some of the elusive, clear ZIG Wink of Stella. over them. That is for the eye of the beholder.

 I used the same masked sentiment from Holly Jolly Christmas. This time I embossed it with Hero Arts gold embossing powder and then added it to the card with foam tape.

 A staple for me with my holiday card and tag making is May Arts metallic gold string and May Arts metallic silver string. I love having something so simple to make something a little more special. So I finished it with a simple bow and called it done!


Thanks so much for crafting with me and so much love to the team at Ellen Hutson for inviting me back to the blog today.

 ~Tracey

November 1, 2021

Color Hues #29

It's time for a new color another challenge at the Color Hues! I hope you join us for Color Hues #29!

I bought the Toadstool Garden and Mighty Oak dies from the Greetery when they were released last year but this is my first time using them! The new colour palette was the perfect time to get them out to play.

I made some really amazing background panels using Tim Holtz Mica Stain sprays! Talk about addictive! I sprayed a couple panels using the the colours Jack O Lantern and Crooked Broomstick. It was so fun to see the different variations in hues as the two ink colours blended together, not to mention the amazing metallic shine! Once they were dry I cut out some toadstools and leaves and arranged them on to a Shiplap background also from the Greetery.


The sentiment is from the Essentials by Ellen Pumpkin Season stamps and co-ordinating dies.


Thanks for popping in and if you haven't been there already, head over to the Color Hues blog to see what the rest of my awesome teammates have made with these two colours!


October 16, 2021

Color Hues #28

It's time for a new color another challenge at the Color Hues! I hope you join us for Color Hues #28!

I have always loved these colours together, especially at Christmas time!

This CAS card would be a good choice for mass producing. You could do all the cutting or stamping first and then quickly make the cards using an assembly line approach.

I started off by creating a snowy background with the MFT Paint Splatter rubber cling stamp. I white embossed it on a 5.25 x 4' panel of kraft cardstock. The snowdrifts were made using an older Pretty Pink Posh die set that I trimmed down to the width of the panel. 

TIP: If you didn't have a die for snowdrifts it's so easy to make your own with scissors. Use a piece of cardstock the width of your card depending on the orientation--portrait or landscape. For best results cut in one continuous motion across without stopping so the drift looks more natural

The Christmas trees were cut with a triangle tree die--cut in red, white and gold sparkle cardstock. I added a bit of dimension with foam tape behind the gold tree and the sentiment, The Greetery Sign and Sealed stamp set.


I can't wait to see what you all create but first head over to the Color Hues blog to see the fabulous creations my teammates have made for Color Hues #28!

Have a great day!


October 15, 2021

Essentials by Ellen Winter and Christmas Release

The Essentials by Ellen Winter and Christmas Release is available right now at Ellen Hutson!


Also with this new release Ellen Hutson has a gift for you when you spend $75 or more. Your gift is added to your cart automatically once you have $75 in your cart!


I had a chance to play with some of the new products and I have a few cards to share with you today.

For this first card I used an assortment of images from the brand new Holiday Sprigs stamp set. The images were randomly stamped on a 5.5 x 4.25" panel of  Tim Holtz watercolor paper using VersaFine Onyx black ink and clear embossing powder. I watercoloured the images using Distress Inks and then the panel was trimmed down to 5.25 x 4". I matted it with red cardstock and the white embossed sentiment is from the new Holly Jolly Christmas stamp set.


For my next card I stamped the outline images from the Holiday Sprigs stamp set with Gina K almalgam ink. Next I stamped the images a second time using the cordinating solid image and Concord & 9th inks. Once dry I die cut the images with the new coordinating Holiday Sprigs dies. The images were arranged and adhered to a white matted top folding card base with glue and foam tape. The same sentiment from the Holly Jolly Christmas stamp set was gold pearl embossed on the card front.


For my final card is a bit more playful. I created a background using the tree from the Holly Jolly stamp set then I trimmed the panel down to 4.25 x 4.25 and added it to my card base with foam tape. The big red Fa la la is from the same set was white embossed and added over the trees in the upper panel. The perfect sentiment from the movie Elf in black at the bottom!


This is such a fantastic Christmas Release so much to get your cards done for this yeat. Head over to Ellen Hutson for all the details and to get your free Gift With Purchase!!

All the products I used for today's cards are listed below for your convenience.
NOTE: Affiliate links used at no cost to you. See my Disclaimer for details.\

Have a great day!