July 31, 2018

Summer and More - July 2018


I know I say this every month, but wow here we are the last day of July and of course that means time to post this month's kit from The 12 Kits of Occasions!

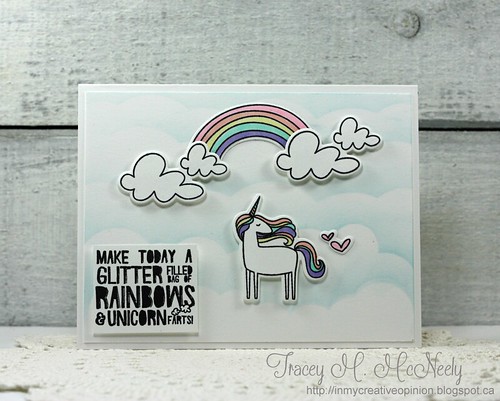
This month our hostess is the lovely Marybeth's Lopez from Marybeth's Time for Paper. She sent us a fun summer filled collection of beautiful and cute images and die cuts and she created a perfect colour palette for us to play with too. I had so much fun playing with this kit. It has been a very busy summer for me this year and if was really nice to sit down and have a chance to play with supplies that are new to me and make some cards for fun!

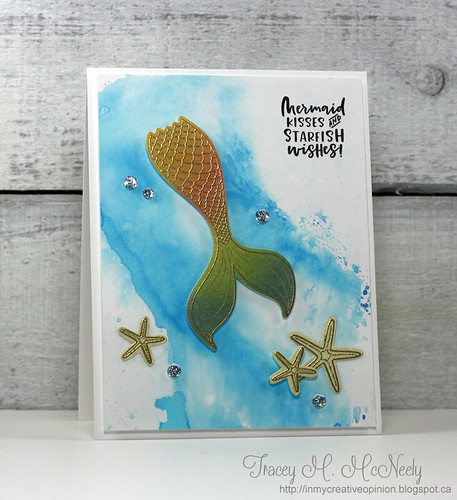
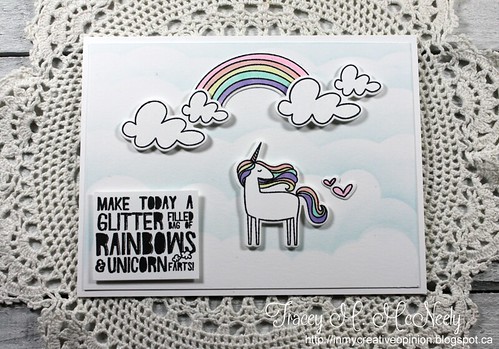
I made three cards with this month's kit and I have leftovers for casing the other girls.


Here they are all together...


I can't wait to find some free time to sit down and colour the pretty Fushia's that were in our kits!
Have a good day!


July 30, 2018

Monster Shape Shaker | Jillibean Soup


Happy Monday!
I have another fun card the was posted last week on the Jillibean Soup Bean Talk blog.


The Shape  Shaker program at Jillibean Soup simplifies the task of making fun shaker cards. I thought I would share the instructions on how I made my card.

  1. Sponge some Twisted Citron Distress Oxide ink on a Shape Shaker Small Circle card base. 
  2. Once dry the Happy Birthday sentiment from the Succulents stamp set was stamp with VersaFine Onyx Black in on the the bottom of the card front.
  3. Splatter some dye ink onto the card base for some extra fun!
  4. Then monster's eye was stamped on the inside of the card directly behind the opening of the card base. Colour it with a blue Copic marker.
  5. Stamp the monster from the Monster clear stamp & die set and then die cut it with the Monster die. 
  6. Use the Monster die once again to cut the shape out of one of the journaling cards on the back of the 2 Cool for School Bite Sized Bits. 
  7. Adhere the cut journaling card on to the Shape Shaker Small Circle card base that I has already been sponged over the opening. Make sure to leave and even space all around the opening.
  8. Inlay the stamped and die cut monster into the journaling card.
  9. To add the shaker component you will need to fill the Shape Shaker Small Circle Insert with seed bead from the Cool collection of fillers.
  10. Remove the baking from the shaker and open up the card base. Place the baking into the opening (you are working with it upside down).
  11. Close the card pressing to make sure the shaker it adhered all the way around.


Hope you enjoying today's tutorial. I have listed the products I used for my card below so that you can make one of these shakes too.


July 27, 2018

Spellbinders Sew Handmade


Happy to share with you today that I have had the opportunity to play with some products recently from Spellbinders! I was sent the Spellbinders Sew Handmade and the Spellbinders Handcrafted Handmade collections by Stephanie Low to play with. Discount code for Spellbinders below my projects!

For my first card I created a background on a panel of Bristol Smooth cardstock using Cracked Pistachio and Worn Lipstick Distress Oxide Inks. Then I stamped and Copic coloured the main image and the sentiment from Spellbinders Sew Handmade. I popped up the thread with foam tape for some extra dimension.


For my second card I randomly stamped the small flower image from Handcrafted Handmade repeatedly onto a panel of Bristol Smooth cardstock using Versafine ink and then clear embossed it.  The images and the sentiment were coloured with ZIG clean color real brush markers.


Shop at Spellbinders for 10% off by following this link--> SBSAVE10


July 23, 2018

Hugs and Kisses | Jillibean Soup


Happy Monday!
I have a quick and easy to mail get well card for you today using some Jillibean Soup products.
This card for featured last week on the Jillibean Soup Bean Talk blog.

I used the Jillibean Soup Get Well stamp set to stamp my rainbow of bandaids using Lawn Fawn inks. The sentiment from the same set was stamped with VersaFine Onyx Black ink at the bottom and the panel was trimmed out and adhered to a piece of Boys Rule patterned paper from the 2 Cool for School Collection. A cardstock sticker from the 2 Cool for School Collection was added to the top. Card done, sure to brighten someone's day and nice and flat for mailing!


July 22, 2018

Succulents | Jillibean Soup


I had this card up on the Jillibean Soup Bean Talk blog a couple weeks ago. For some reason I love anything to do with succulents and I just can't get enough playing with the Succulents stamp and die set from Jillibean Soup.


July 17, 2018

Octopus Adventures | Jillibean Soup


The Octopus clear stamp and die set from Jillibean Soup is such a fun set for creating great underwater scenes. This card and process video were posted on the Jillibean Soup Bean Talk blog a couple weeks ago.

I created my underwater background by first embossing some bubbles in white on Bristol Smooth cardstock. Next I sponged the background using Salty Ocean and Wilted Violet Distress Oxide Inks. Then I flicked some clean water on to the panel and picked up some of the ink with a paper towel. Once the background was done I set it aside to dry.  All of the images were clear embossed in Versafine Onyx Black and watercoloured with ZIG Clean Color Real Brush Markers and then adhered with adhesive or foam tape.


July 16, 2018

Mandala Shaker Card | Birch Press Designs


Happy Monday!

I am up on the Birch Press Designs blog today with a Mandala Shaker Card and video. I hope you pop over there to say hello and maybe pick up a few of my favourite tips for making shaker cards!


Supplies and links to shop. 
Your support is always appreciated.


July 13, 2018

Watermelon Birthday Wishes


There is something about watermelon in the summer and for me I love watermelon images for summer home decor and crafting projects. Last week I made a watermelon birthday card for my daughter and made it into a gift ensemble using the ingenious card hanger die by my friend Laurie Willison from Soapbox Creations.

I love this die because you don't have to hide your pretty handmade cards in an envelope. You just put it in the slot and it decorates the bag!

I made my card with Papertrey Ink's Watermelon dies and Fruit Stand Sentiments. I started by preparing my background swiping some blue Distress Oxide ink onto a panel of Bristol Smooth cardstock. Then I sponged three colours of  Distress Ink and Distress Oxide inks on to panels of Bristol Smooth cardstock, flicking some water on the panels that I absorbed with paper towel. Once dry I die cut the watermelon pieces. A sentiment was added and then I adhered and inlay the watermelon to the card.


I cut the card hanger die from some blue gingham paper, trimmed the opening and added the card.


Hope I made you smile,
have a wonderful weekend!


July 10, 2018

New Craft Stash Blog Hop


Welcome to Day 2 of the...


I am so excited today to be hopping along today on the New Craft Stash Blog Hop! What does this mean? The idea of this just for fun Blog Hop is that the participants are using something new--"New" meaning - new to the papercrafting market, new to the participants, or newly discovered in our Craft Stash - you know the stuff you bought, tucked away and forgot about! The Blog Hop is split over three days, so if you missed Day 1 you can go to Ingrid Blackburn's blog to get a list of links for the Day 1 participants. By following the hop you have a chance to win one of 6 prizes plus there are a few other prizes along the stops of the hop.

For my card today I am using the new Essentials by Ellen Inner Mermaid stamps and designer dies! I combined my new stamps and dies with some stamps and dies that I have had for some time now that got filed away and forgotten.


I created a video for you to show you how my shaker card was put together. Some stamping, die cutting, embossing and ink blending to create this porthole shaker-whoa, is that a mermaid swimming by?


I hope you enjoyed my video. Don't forget to comment you way along the hop so that you will be entered for your chance to win a prize from one of these fabulous sponsors!


Now it is your turn to complete the Blog Hop. I am sure you will be inspired by all of the participants posts...
Day Two New Craft Stash Blog Hop List


If you missed Day's 1 and 3 you can head back to Ingrid Blackburn's blog HERE to get all the links!

Happy Hopping!


July 9, 2018

Muse #274 and Freshly Made Sketch #344

tracey_Muse#274_cover


Happy Monday! Time for new challenge at Muse!


tracey_Muse#274

Inspired by the sketch at Freshly Made Sketches #344 but I flipped it the other direction.

tracey_Muse#274_closeup


July 8, 2018

Essentials By Ellen July Release '18

tracey_EHunicorn_cover


The new Essentials by Ellen July Release is available for sale!

I created a FUN card using the new Unicorns 'N Rainbows Stamp Set designed by Julie Ebersole! This whimsical Unicorn may have made a foo-pah, but you can't be offended when he is this cute--Sorry mom!

The images were die cut with the new Unicorns 'N Rainbows Designer Dies


tracey_EHUnicorn


Hard to see the elusive Clear Wink of Stella (still my go to when I want to add shimmer to card) painted over all of the images! It just doesn't like the camera! Just try to imagine, it is beautiful in real life!


tracey_EHUnicorn_flat

The clouds on the rainbow were offset so that the design was asymmetrical, adding more whimsy to these fun images. I added lots of dimension to this one!

tracey_EHUnicorn_dimension


I will be sharing more cards that I have have made this week.
These links are for all the new products released today for your convenience. Thank you if you shop through my links at no cost to you. I appreciate your support.

Have a wonderful day!