Exciting news, Studio Katia has a brand new release in the shop and today the design team is hopping to show it off. The new release includes 5 new clear stamp sets, 3 sets of coordinating dies, 8 new stand alone Creative Dies, 4 new Stencils, 10 new embellishments and 5 new glitter jars! The release is live and available for purchase in the store now!
I am not hopping along with the team today but I wanted to share that if you head over to Studio Katia to hop along you have a chance to win!
I have a fun little penguin party today over on the Studio Katia blog. Once the Christmas holidays are over I start to build up my winter birthday card stock supply. My Dad loves penguins so I gave this one to him for his 92nd birthday that happened last week!
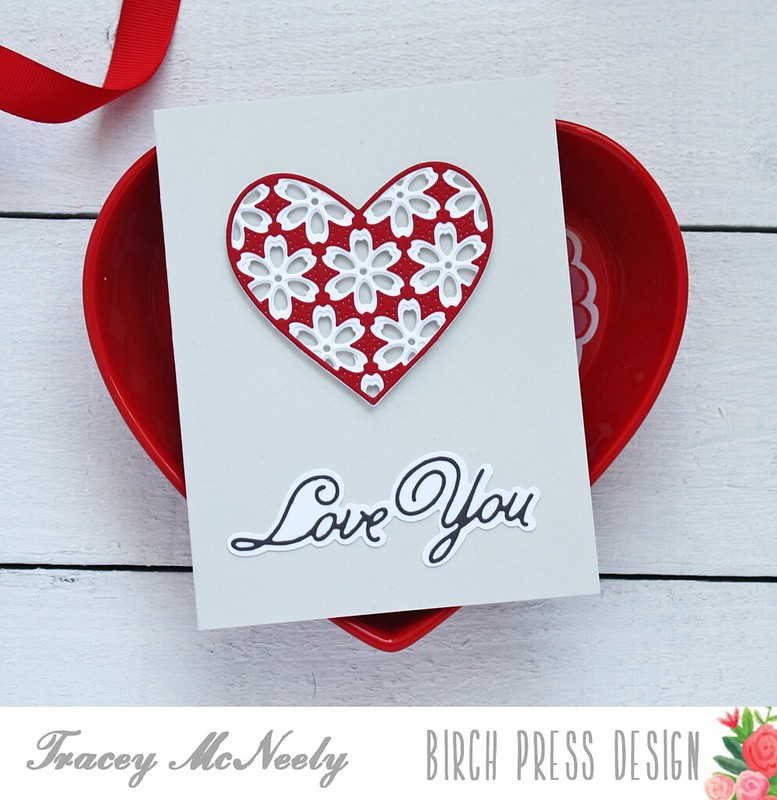
I stamped the penguins and iceberg from the Kobi's Ice Day stamp set and then die cut the images with the Kobi's Ice Day co-ordinating dies. I coloured the images with Copic markers with some very simple two-shade colouring. The trees are from the Holiday Village Stamp set and they were cut with the Holiday Village co-ordinating dies, also coloured with Copic markers.
To create my icy water background I swept some Salty Ocean Distress Oxide ink on to my glass mat and spritzed it with some clean water. Then I swept a piece of Bristol Smooth cardstock over the ink on one quick motion.
Once the inked background was dry I attached it to the card base using Studio Katia white foam adhesive. The iceberg, penguins and trees were attached with a combination of adhesive tape and white foam tape.
The sentiment in the bottom right corner is from the It's Your Birthday stamp set and was white embossed on black cardstock. To finish the card off I glued some Iridescent Crystals to the card front and it is done
I hope you have some time to pop over to see my card, also to find out if you were the winner of last week's GIVEAWAY !
I have a card and video up on the Birch Press Design blog today using the new Dazzle Bevel Layer Set dies.
I hope you have a chance to pop over and see all the details!
To begin with I ink blended a rainbow background using Distress Oxide inks in Pink Raspberry, Spiced Marmalade, Wild Honey, Mowed Lawn and Peacock Feather. I cut all the layers from the Dazzle Bevel Layer Set from white and glued the layers together to create two panels--one for the top and one for the bottom.
I used the Hello Topper die for the first line of my sentiment and then I used the Just Because stamp set for the second line 'crafty friend'.
I am up on the blog today sharing my final post with A Jillian Vance Design! I have thoroughly enjoyed the past couple of years on the design team and a birthday celebration to the perfect post to end my journey with them! Thank you Bunny & Jillian!
I used the fabulous new Make A Wish 6 x 8 Stamp Set for this first card. The ribbon was Copic coloured using V12, V15 and just a touch of V17. To create the polka dotted wrapping paper on the present I paper pieced the stamped image with some fun purple patterned paper. I stamped a few tiny hearts from the Big Love stamp set for a bit of interest. The top panel was cut with the Stitched Dot Rectangle Backdrop die and attached to a purple card base with foam tape for a bit of dimension.
I stamped and white embossed the Hollywood strip from the Make A Wish stamp set across the bottom of a piece of bright patterned paper. Trimmed down to 5 1/4" x 4" it was attached to a white card base. I die cut the large flower from the Delightful Daisy Jr. die set from red cardstock. I die cut the pink flower center from patterned paper and white embossed the sentiment from the new Hey Cupcake stamp set in the center. Both the red flower and then the pink center were attached to the card base with foam tape. Just enough dimension and still able to mail.
Thank you for stopping in today and I hope you head over to the A Jillian Vance Design shop to check out the new release and maybe enjoy the free shipping offer!
Thank you to everyone who took the time to stop in and leave me the kindest and warmest messages for the blog hop. I have used Ramdom.org to select a number for the winning comment to receive the prize below.
Today is my first post and tutorial over on the Studio Katia blog as a new member of their design team! I am so excited and can't wait to inspire you to use their products!
Today I created this sweet Winter Wishes card. The full reveal of my card and a tutorial is on the Studio Katia and I would love it if you popped over to say hello, also there is a GIVEAWAY on the Studio Katia blog for my first post.
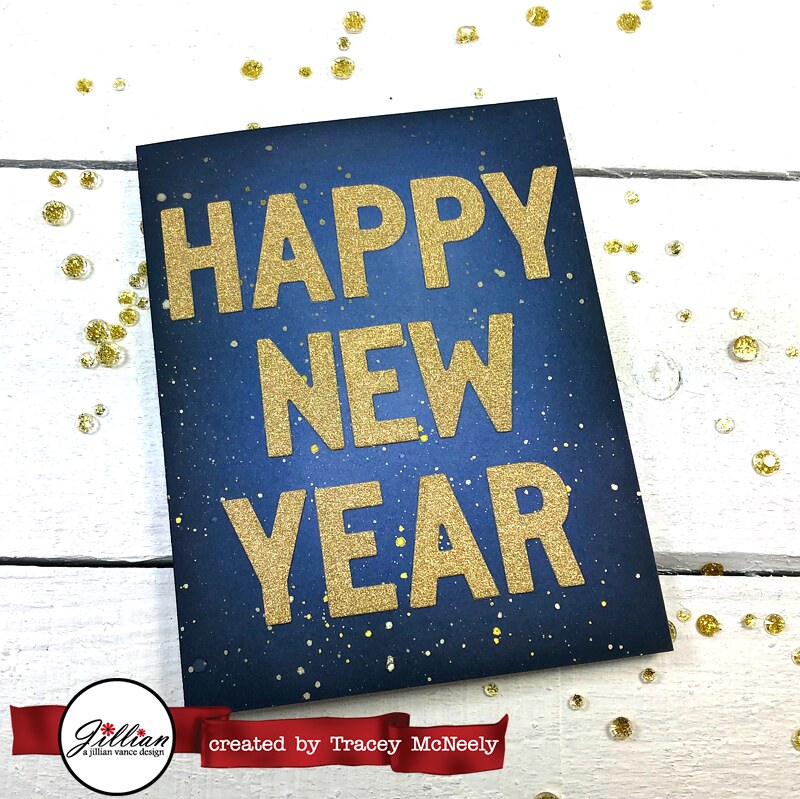
Happy New Year and welcome to the Season's Givings Blog Hop!
This is the 8th year that designer Latisha Yoast has been hosting this blog hop and it is a way to let our followers know just how much we appreciate them. Each and every stop along the hop is hosting a giveaway and as you can see from the list below there are a lot of stops and a lot of GIVEAWAYS!
I would like to thank each and every one of you who takes the time to read, comment on or just visit my blog to browse. Your comments and encouragement are truly appreciated and I hope that you find a bit of what you are looking for when you stop by because I love to share with and inspire other crafters!
At the end of the year I like to go back and reflect on some of my favourite projects from the previous year. So here are a few of my favourites for 2019!
To say thank you to all of you who inspire me to create every day. I am sending this prize pack to one lucky winner who leaves me a comment on this blog hop. You have until Tuesday, January 7th 2020 11:55 pm to leave a comment for your chance to win.
Make sure you do the blog hop for a chance to win one of the GIVEAWAYS being offered on all these fabulous blogs!