August 31, 2018
August 28, 2018
Rubeena's Crafting Anniversary Blog Hop

Welcome to Rubeena’s Crafting Anniversary 2-Day Blog Hop! You should have arrived here from Leanne West's blog. If you didn't, no worries, I have the full blog hop list down at the bottom of my post.
I am so excited to be participating in this epic hop with more than 70 guests and over $600 in sponsored prizes hosting by my dear friend Rubeena!! Not only are we celebrating four years since Rubeena first discovered cardmaking but also crafting in general. This industry is made up of wonderful individuals who are creative, inspirational, kind, and incredibly supportive! Hop along so you can learn about why we create and how much joy it brings us! For details on day one of the hop, you can visit this post.
First a bit about my own creative journey...
I have been creative my entire life, when I as young I took art lessons for many years learning to sketch still life and later oil pastels. I entered the world of paper crafting as a teenager creating scrapbooks, old school--no embellishments! I tried all types of different crafts as an adult--sewing, knitting, dried flowers (was obsessed), folk art painting and then cardmaking. My journey got a bit derailed 17 years ago now when I was diagnosed with MS. Life offered my lots of new difficulties, one of the biggest is muscle weakness in my right side and a pesky tremor in my hands sometimes. However I didn't let that stop me and I found my way back to cardmaking and scrapbooking then started my blog in January 2011, that was also the year I started my 25 Days of Christmas Tags challenge. I love this cardmaking community, so many wonderful and talented people. I have made friends all over the world and I have been so fortunate to meet so many people in real life too. I hope you enjoy the hop and get inspired to create from so many fabulous crafty people!
I made two cards for the blog hop today, both using Altenew stamps and coloured with my brand new 36 half pan Altenew watercolors. Deliciously creamy!! My first card uses the Camellia Build a Flower and the second card is made with the Dahlia Blossoms stamp set. Both cards have sentiments fron the Crafty Friends stamp set--since this hope is all about crafty friends!!


GIVEAWAYS
In celebration of this anniversary, we have several amazing sponsors. Let’s thank them for their generosity! Winners will be randomly selected from comments left on all the blogs. The winners will be announced by Wednesday, September 5 on this page. Winners will have up to 2 weeks to contact Rubeena at ararerubycrafts@gmail.com to claim their prizes.
Studio Katia - $50 gift card
Hello Bluebird - $50 gift card
Altenew - $50 Gift card
Pinkfresh Studio - $30 gift card
Gina K. Designs - $50 gift card
Clearly Besotted - $35 gift card
Simon Says Stamp - $25 gift card
Spellbinders - Card Kit
Jennifer McGuire - $50 Simon Says Stamp gift card
winnie & walter - $40 gift card
Mama Elephant - $25 gift card
Hero Arts - $25 gift card
Nichol Spohr - Custom-sewn rainbow pencil case filled with brand new Spellbinders dies
Danielle Flynn - $25 Simon Says Stamp gift card
Picket Fence Studios - four $25 gift cards
BLOG HOP
The next stop on the hop is the fabulous Marge Yoon I know you will not be disappointed in what she has for you today. Thank you so much for stopping by and make sure you stop in at Rubeena Ianigro's blog, it is always loaded with inspiration!
August 27, 2018
Birch Press Design Blog Blitz | Holiday Release

Have you been following along with the Birch Press Design Holiday Blog Blitz? It is running from August 23rd - August 28th! Each day of the blitz there is a difference giveaway. You have a chance to comment of all the posts over on the Birch Press Design Blog until August 28th for your chance to win!
Today I am introducing to new Splash Layers dies over on the Birch Press Design Blog!

Head over to the blog to see how I created this card and for your chance to win!
Good luck!
August 25, 2018
Winnie & Walter Leading Lady - Week 4
Happy Saturday today is my final week of taking over at the Winnie & Walter blog as the August Leading Lady. I have had such a great time playing with you all each week with so many fabulous Winnie & Walter products. Thank you Shay for letting me have the spotlight this month!

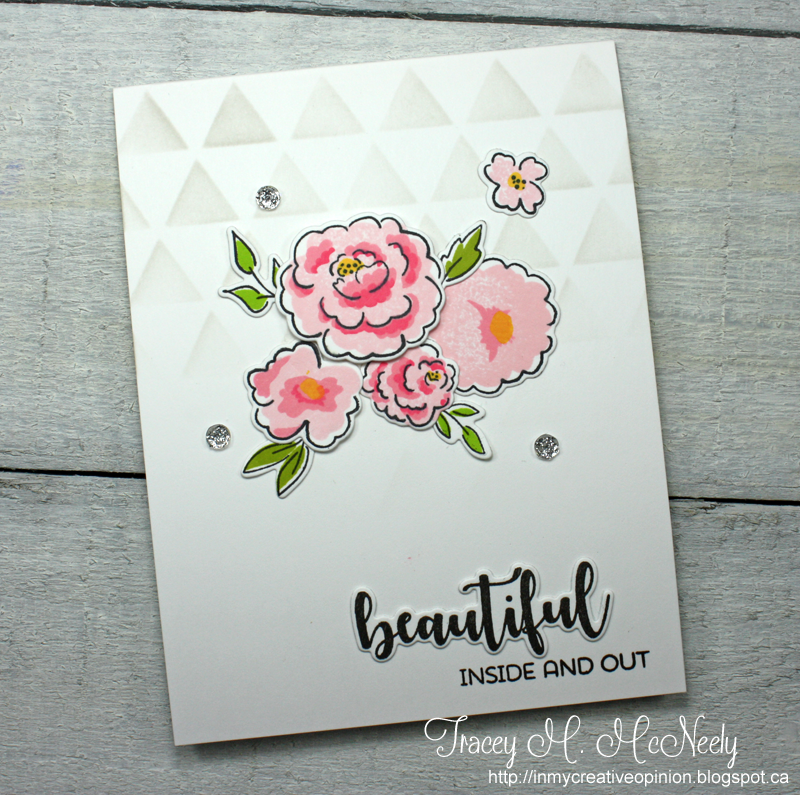
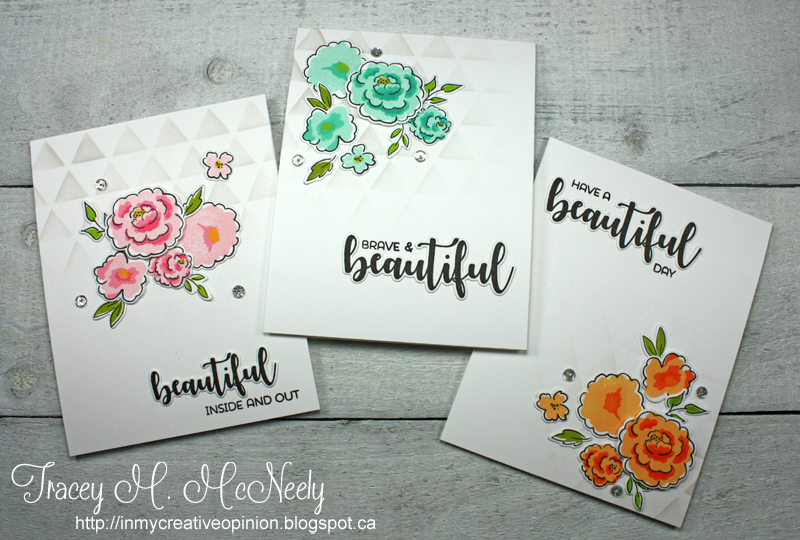
For my final week I am creating three cards using one stamp set. I liked this set before, but now that I have worked with the layered stamps I am totally in love with the In Bloom: Ashlee's Rosie Posies with Lydia Evans stamp set. I used the layering guide that you can find in the Storyboard for this set on the Winnie & Walter blog HERE. The guide made lining up the layers for these images foolproof.
I chose three colours schemes and I stamped and die cut the flowers and leaves with the co-ordinating Cutaways. I also die cut both sizes of the 'beautiful' sentiment so that I could chose as I arranged my cards. Although I am using the same stamped florals for each card I wanted my designs to be distinctively different.
Once I had all the pieces stamped and die cut I lightly sponged backgrounds on my card bases with the Scenery: Triangled Creative Screenings. I adhered the flowers to each card in a different postition and arrangement adding foam tape to the main flower for dimension. On the completed cards I added a few sequins for balance and filled each sequin with some silver Stickles for added sparkle!


Don't forget I have a $30 gift certificate for Winnie & Walter gift certificate to giveaway on my blog, In My Creative Opinion. Visit all four of my Leading Lady posts this month and leave me a comment. On September 3rd I will draw a name from all my comments from over the month to win. You can enter once for each week so you could have up to four chances to win...good luck!

I really enjoyed being your Leading Lady this month and I really hope you enjoyed my posts to. Enter my giveaway for your chance to win! Have a wonderful day and thanks for joining me!
August 22, 2018
August Projects from Jillibean Soup

Sharing some projects today that were posted last week on the Jillibean Soup Bean Talk Blog.
This first card features patterned paper from the 2 Cool for School Collection and the bicycle stamp from the Bowl of Dreams clear stamp set.


The second project is a tag using the Shape Shaker Balloon Tag Base along with fun paper from The Souper Celebration Collection. I created a short video tutorial to show you how I put this tag together and how easy it is to create shaker tags and cards using the Shape Shaker Series of products!


Thanks for coming by today!
August 20, 2018
Paper Sweeties 6th Anniverary Celebration

I am so excited to be helping Paper Sweeties celebrate their 6th Anniversary!
During this month they are having a birthday challenge, based on this inspiration!

The winner will receive a $100 shopping spree to the Paper Sweeties website. Voting is turned on for viewers to 'like' their favorites so the public can choose who wins! It also includes a coupon for 20% off any full-price products at Paper Sweeties!
The first card I am sharing today uses the Happy Cake Day stamps and Sugar Cuts. I used patterned papers from Doodlebug Designs Cream & Sugar 6 x 6 pad. the balloons were coloured with ZIG Clean Color Real Brush Markers and popped up with foam tape.

I used the Paper Sweeties birthday challenge and Freshly Made Sketches #350 for my inspiration.

My second card uses the Happy Cake Day and Birthday Banners stamps and Sugar Cuts. Images were coloured with Copic markers and he cake was popped up with foam tape!.

Thanks for stopping by today and be sure to head over to Paper Sweeties and wish them a Happy Anniversary and play the birthday challenge while you are there!
August 18, 2018
Winnie & Walter - Leading Lady Week 3
Here we are back to Saturday once again and I am taking over the Winnie & Walter blog with my Week 3 post as the August Leading Lady.
This week I am focusing my projects on ways that I love to use Distress Oxide inks with my stamped projects! For me I was instantly in love with the properties of these inks and how much fun they are to use and blend together. I use them for blending, for smooshing, for watercolouring and even for stamping.
For my first project I combined embossing with blending to create this card that I made for my husband for today which is our 28th wedding anniversary! I actually made two cards the same but used different ink colours. I started by white heat embossing the hearts from Scenery: Seeing Hearts across the top of my panel of Bristol Smooth cardstock. I use Bristol Smooth cardstock for most of my Distress Oxide ink projects because of the way the inks blend so smoothly on it and also because it can take a bit of water. After I embossed the hearts I blended my background on the first card with Tumbled Glass, Mustard Seed, Ripe Persimmon and Warm Lipstick Distress Oxide ink. As I blended the inks I used clean pieces of white copy paper to hold the paper as I blended so that I didn't get any fingerprints on the panel as I worked.
After a blended the ink I use a clean paper towel to wipe the excess ink off of the embossed hearts. I flicked some water on to the panel and absorbed it back along with some of the colour with clean paper towel so you can see some of the oxidization. My sentiment 'love you' came from the In a Word: Love clear stamp set. It was clear heat embossed with VersaFine Onyx Black ink.

For the second project, with the same design, I blended Tumbled Glass, Squeezed Lemonade and Worn Lipstick Distress Oxide inks. I flicked some water on to the panel and absorbed it back along with some of the colour with clean paper towel so you can see some of the oxidization. Once again my sentiment 'love you' came from the In a Word: Love clear stamp set. It was clear heat embossed with VersaFine Onyx Black ink.

Can you guess which of the two cards that I gave my hubby?
My third and final project was done with my most favourite technique to do with Distress Oxide inks--smooshing. I laid some Shaded Lilac, Seedless Preserves and Crushed Olive Distress Oxide inks on to my craft mat and spritzed the inks with water. Then I took a 5 1/4" x 4" panel of Bristol Smooth cardstock and quickly swiped into through the inks, on an angle, in one pass and set it onto a piece of paper towel to dry. Once dry I stamped my image from Welcome to the Family with Evelyn T. Designs and the tiny 'sweet baby' on to the panel. The In a Word: Cuddles Cutaway was cut three times from white cardstock and glued together for dimension before it was adhered just above the 'sweet baby' sentiment.


For my first project I combined embossing with blending to create this card that I made for my husband for today which is our 28th wedding anniversary! I actually made two cards the same but used different ink colours. I started by white heat embossing the hearts from Scenery: Seeing Hearts across the top of my panel of Bristol Smooth cardstock. I use Bristol Smooth cardstock for most of my Distress Oxide ink projects because of the way the inks blend so smoothly on it and also because it can take a bit of water. After I embossed the hearts I blended my background on the first card with Tumbled Glass, Mustard Seed, Ripe Persimmon and Warm Lipstick Distress Oxide ink. As I blended the inks I used clean pieces of white copy paper to hold the paper as I blended so that I didn't get any fingerprints on the panel as I worked.

For the second project, with the same design, I blended Tumbled Glass, Squeezed Lemonade and Worn Lipstick Distress Oxide inks. I flicked some water on to the panel and absorbed it back along with some of the colour with clean paper towel so you can see some of the oxidization. Once again my sentiment 'love you' came from the In a Word: Love clear stamp set. It was clear heat embossed with VersaFine Onyx Black ink.

Can you guess which of the two cards that I gave my hubby?
My third and final project was done with my most favourite technique to do with Distress Oxide inks--smooshing. I laid some Shaded Lilac, Seedless Preserves and Crushed Olive Distress Oxide inks on to my craft mat and spritzed the inks with water. Then I took a 5 1/4" x 4" panel of Bristol Smooth cardstock and quickly swiped into through the inks, on an angle, in one pass and set it onto a piece of paper towel to dry. Once dry I stamped my image from Welcome to the Family with Evelyn T. Designs and the tiny 'sweet baby' on to the panel. The In a Word: Cuddles Cutaway was cut three times from white cardstock and glued together for dimension before it was adhered just above the 'sweet baby' sentiment.

I have a $30 gift certificate for Winnie & Walter gift certificate to giveaway on my blog, In My Creative Opinion. Visit all four of my Leading Lady posts this month and leave me a comment. On September 3rd I will draw a name from all my comments from over the month to win. You can enter once each week so you could have up to four chances to win...good luck!
I hope you enjoyed learning how I use Distress Oxide inks to created backgrounds for my cards. See you again next Saturday for another Leading Lady post. Have a great day.
August 15, 2018
Stenciled Friend | Birch Press Design

I have a post up on the Birch Press Design blog today for this stenciled friend card!
A clean and simple monochromatic beauty. All the details are over on the Birch Press Design blog. I would love it if you popped over and let me know what you think.


August 13, 2018
Muse #279 with Pretty Pink Posh | Geranium


Happy Monday! Time for new challenge at Muse!
I used the Pretty Pink Posh Geraniums stamp set for this week's card. I started off by smooshing some watercolour paper into Tumbled Glass Distress Oxide ink that had been spritzed with water. While I waited for it to dry I stamped and coloured some flowers from the set and then arranged them on the watercolour panel some with tape runner and others with foam tape. A sentiment from Pretty Pink Posh Simple Sayings: Miss You was stamped underneath.

A little closer look...

I can't wait to see how you are inspired this week over at Muse!
August 11, 2018
Winnie & Walter - Leading Lady Week 2
Happy Saturday and I am back again today taking over the Winnie & Walter blog with my Week 2 post as the August Leading Lady.
Last week I gave you some tips on ways I personally add extra to my CAS cards without adding extra weight to my cards both physically and design wise. This week my theme is creating backgrounds. I'm going to share some tips on how I create my own background panels by using images from the same or multiple stamp sets.
When creating a background with multiple stamps I follow some basic rules to make the design look more authentic and sometimes whimsical.
1) Stamp some of the images off the edges.
2) Rotate the images so that they are no all the same direction.
3) Either leave the same amount of space between all images or vary the spacing to once again encouraging the artistic and whimsical feel.
4) I personally always start my design in the upper left corner of my panel and then as I build the images I work down and towards the centre of the panel filling in the spaces as I stamp. There is less chance of getting cornered where you can't fit an image into the space and end up leaving an awkward space.
For my first card I used Purrfect with Evelin T Designs to create a fun background for this playful kitty. To reinforce that the playful theme of the card the balls of wool are all turned all different directions and the spacing varies to represent that this naughty kitty left the balls of wool all over the house! All my stamped was done with Copic friendly ink and the images were coloured with Copic Markers--R00, G12, B000, V01, Y13, T0 and T1.

A closer look--

For my second card I used In Bloom: Carolina`s Florals with Angelica Suarez. I stamped and heat embossed the outline images from the set with with VersaFine Onyx Black ink and clear embossing powder on Bristol Smooth cardstock to use with ZIG Clean Color Real Brush Markers. On this card I kept the spacing between the images similar but I did continue to turn the images around on the panel. I used the two tiny branches to fill in the gaps. The ZIG colours I used were--021, 028, 050, 052, 036, 031 and 041. Once the watercolour was dry I added my sentiments. The happy and `birthday wishes`were both heat embossed in white on black cardstock. The happy was popped up with foam tape.

A closer look--

I have a $30 gift certificate for Winnie & Walter gift certificate to giveaway on my blog, In My Creative Opinion. Visit all four of my Leading Lady posts this month and leave me a comment. On September 3rd I will draw a name from all my comments from over the month to win. You can enter once each week so you could have up to four chances to win...good luck!
I hope you had fun learning how I create my own patterned backgrounds with stamps. See you again next Saturday for another Leading Lady post. Have a great day.