Pages

February 23, 2021

Big Thanks


Hi crafty friends, hope you are all staying well and surviving this Covid winter. It seems that during lockdown/Stay at Home orders since Christmas there are more things to do than ever before. The world beyond card making--LOL! 

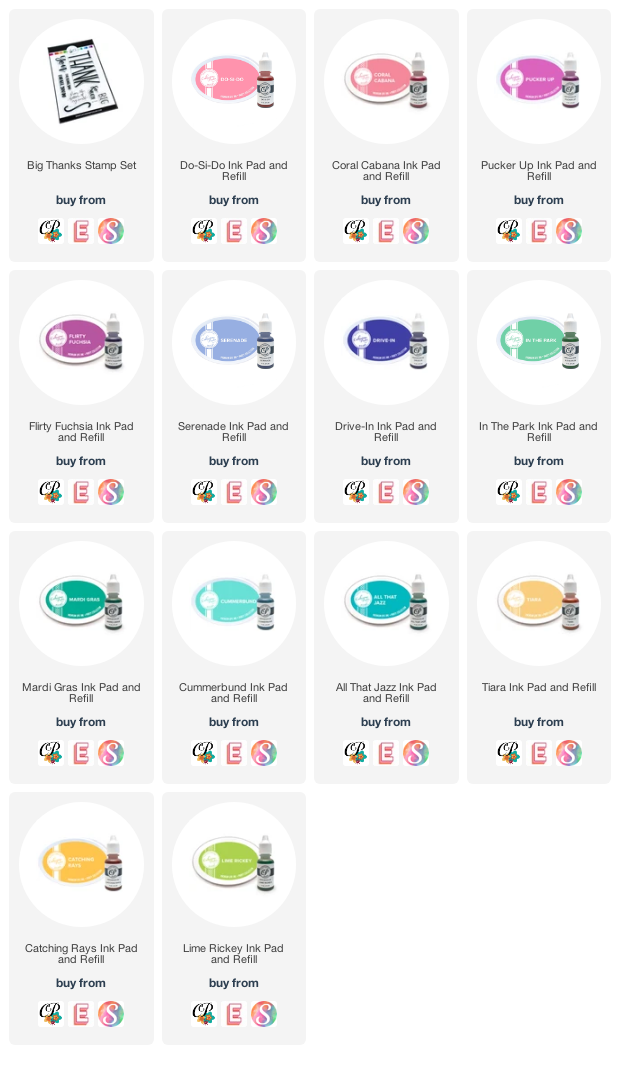
After taking a break from crafting I am back today to share some cards that I made using the some of the newest colours of Catherine Pooler inks! I used the Catherine Pooler Big Thanks stamp set and Catherine Pooler inks for all 6 of my cards. This is such a great set to have on hand. You can so easily put together the perfect sentiment depending on the type of thanks you are looking for.

I also used Catherine Pooler's new Party Collection color wheel. For each card I selected colours from the suggested colour combinations along with their complementary colour suggestions! You can find the color wheel download HERE.

For the first card in this group, I used Cummererbund, All That Jazz and complimentary colour Coral Cabana. On the second card I used Pucker Up, Flirty Fuchsia and complimentary colour Lime Rickey.


Group two actually uses the colours of Laurentian University where both of my graduated from. This was done by chance-lol! I used Serenade, Drive In and complimentary colour Catching Rays on both cards.


The third set didn't want to smile nice for the camera! One the first card I used In the Park, Drive In and complimentary colour Do-Si-Do. for the final card I used Do-Si-Do, Coral Cabana and complimentary colour Serenade.


These cards came together so easily with the help of my stamping platform. I used some striped and polka dot papers from my stash for my backgrounds and I popped up all the sentiment panels with foam tape. I have to say it was nice to take some time and just play with new product. Timely because I have a few of these heading out in the mail this week!

Thanks so much for stopping in. I have linked the stamp set and all the inks I used below ink pads and re-inkers are sold separately. Have a great day!

February 20, 2021

Anytime Layered Hearts

Hi there, it's Tracey here today with a couple square cards using the Layered Hearts dies. These began as cards for Valentines, but time got away from me. So they were finished after the 14th as cards that you can send any time of the year. Both of today's cards are 4 1/4" x 4 1/4" square and although the cards are different, they both use the same process.


The Kinsley Heart and the Petal Heart layer sets are beautiful whether you use all three layers together or just the top for a delicate look! I love this die set because even with all three layers you can still see the amazing stitched lines on the bottom layer!


To make the pink heart using all three layers of the Kinsley Heart layers dies. I began by blending a panel with Distress Oxide Inks--Spun Sugar, Picked Raspberry and Seedless Preserves. This will be the background for the layered heart and the bottom layer of the letter dies. It was cut with the largest heart in the Perfect Hearts die set. The layers of the Kinsley heart were cut from white cardstock and glued together. The 'xoxo' was cut using the Mod Alphabet die set. The bottom layer from the ink blended panel and the top from white cardstock.

Before attaching the layered heart and 'xoxo' to the card base it was spritzed with Distress Oxide Spray in Picked Raspberry. I sponged a bit a pink ink on the centre of the heart for interest.

The green card used the Petal Layers die set, but only Layer A for a more delicate design.

Just like with the pink card I blended a panel with Distress Oxide Inks, this time I used Tumble Glass, Cracked Pistachio and Peacock Feathers. I used the panel once again for the layered heart and the bottom layer of the letter dies. Layer A of the Petal Heart layer set was cut from white cardstock. The 'xoxo' was cut using the Mod Alphabet die set. The bottom layer from the ink blended panel and the top from white cardstock.

This time before attaching the heart and 'xoxo' to the card base it was spritzed with Cracked Pistachio and Peacock Feathers Distress Oxide Spray.

So quick and so fun to use similar supplies and the same basic techniques to make two cards to you can use to Share Handmade Kindness!


February 11, 2021

Interactive Pizza Box Card


February 9th was National Pizza Day. A while back I made an interactive cards with an opening pizza box on the front. with the fun MFT Stamps Pizza My Heart Stamp set MFT|EH and MFT Stamps Pizza My Heart die-namics MFT|EH--this is such a fun set!

I was hanging on to it so that I could make a video about how I created my box, and that might still happen, but right now I am taking a bit of a break from videos.

PIZZA BOX
  • Cut a piece of kraft cardstock to 4" x 7 3/4".
  • Score on the long side at 1/4", 3 1/2" and 3 3/4", then flip to the short side and scored at 1/4" and 3 3/4". 
  • Fold and crease all of the score lines
  • Snip a 1/4" into the four corners of the bottom panel to make tabs to put the box together. 
  • Trim a 1/4" off both sides of the lid (you could leaves those on if you want the lid top tuck into the base).
NOTE: To create the little hole in the centre of the lid I used the smallest circle on my crop-a-dile.

The background was made using the MFT Stamps Tiny Check patterned paper MFT|EH matted with red cardstock. The happy birthday sentiment was white embossed on black cardstock.


I die cut all the things I needed to make my gourmet pizza--the crust, the sauce, the mozzarella and all of the toppings using coloured cardstock. I added a bit of  shading to all of the pieces.


Before gluing the pizza to the inside of the box I cut a small piece of parchment paper to put under the pizza just like when you get a take out pizza. Just a fun little detail!


Thanks so much for stopping in today. Enjoy the rest of the week. 
Stay safe!


February 4, 2021

Hugs & Kisses


I have a post up on the Birch Press Design Blog today featuring the Dahlia Heart Layer die set and the Jumbo Lingo Hugs dies. It's so hard to believe that Valentines is coming up soon! I feel like I just put Christmas away, Christmas 2019!!

I am also submitting this card to the Color Hues Challenge #11 - Red & Pink!


I think this is such a fun new challenge but time keeps slipping away from me and then I miss the deadline!


I used the Dahlia Heart Layer dies to create a slimline Valentines card. Using one sheet of white cardstock I was able to make my card base which is 8 1/2" x 7". The remaining piece of cardstock left was 8 1/2" x 3 1/2". I trimmed a 1/4" off of the length and now had the perfect sized mat for the front of my card. 


I started by ink blended a panel of Bristol Smooth cardstock using Distress Oxide Inks--Spun Sugar, Picked Raspberry and Festive Berries. Once the panel was blended I tapped some watered down Perfect Pearls over the panel to add some interest and set it aside for now.

Using the Dahlia Heart Layer A die, I cut a heart near the upper portion of the 8 1/2" x 3 1/2" panel.


I trimmed my ink blended panel down and adhered it to the back of the front panel that I cut the heart from.

Next I used the Dahlia Heart Layer A die and cut it from gold sparkle cardstock. I added liquid adhesive to the back of the gold sparkle heart and I inlaid it into the heart cutout. I panel was adhered to the card base leaving a small 1/8" border.


The hugs sentiment is from the Jumbo Lingo Hugs die EH|SSS. I cut the base layer from my ink blended panel and the top layer with the same gold sparkle cardstock I used for the heart. It was attached to the card using small pieces of foam tape.


To finish off the card I splattered a bit of yellow gold metallic watercolour on to the card front. Then I embossed the XOXO using gold pearl embossing powder.

Thanks so much for stopping in today, hope the sun is shining where you are!