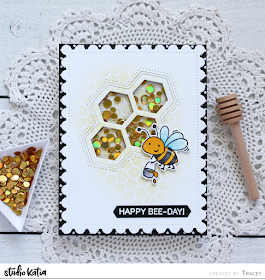
To create my shaker card I needed to work backwards because I wanted my stenciling to show through the windows of the shaker. I started off by cutting a panel of white cardstock with the new Scallop Honeycomb Cover die. Next I cut the Honeycomb Shaker die from my panel on an angle and then I inlaid all the pieces back into the panel.
Then I placed the Honeycomb Stencil over the panel and secured it to my work surface with some Purple Tape. I blended Wild Honey Distress Oxide ink selectively over the panel with all the inlaid in pieces in place. I removed the four centre hexagons. A piece of patterned paper was adhered to a white top folding card base and I laid the remainder of the scallop die cut over the centre of the panel. Glue was added to the four hexagon spaces and the four hexagons adhered through the top panel.
To continue building the shaker I adhered a piece of the new crystal clear Studio Katia Acetate to the back of the scalloped panel over the opening. Then the two most outer rings of the die were inlaid into the top panel over the window with Studio Katia Liquid Glue. I used a double layer of Studio Katia White Foam Tape to build the walls of my shaker on to the back of the scalloped panel. A double layer will give the shaker contents lots of room to shake around! The card base was brushed with an antistatic tool and a couple of spoonfuls of the new Gold Fever Confetti were set over the hexagon pieces. The top scalloped layer was added to the centre of the card to complete the shaker.
A few of the images from the Honey Bees stamp set were stamped and coloured with Copic markers --Y13, Y15, Y17, T2, T4, T6, B0000, B00. Then the images were cut with the matching Honey Bees dies and adhered to the card front with foam tape. The sentiment from the same stamp set was white embossed on black cardstock and cut with a sentiment strip from the Peony Trimmings die set to finish the card off!


Adorable! LOVING that little bee and the hexagons!!!!
ReplyDeleteYour little bee is adorable and I am loving your polkadot card base. I am also loving the detail of the pale honeycomb stamping going diagonally across your shaker.
ReplyDeleteI love the softness of the stenciling Tracey, this is such a cute card!
ReplyDeleteWhat a great shaker birthday card. I love the little bee with his bucket of honey. [Bunny]
ReplyDeleteOh Tracey... I have to say it again: BEE U TIFUL!! and what a fun collection of honey-colored sequins you have, my friend!
ReplyDeleteSweet as honey...
=]
Sweet honeycomb shaker card!
ReplyDeleteOh my gosh Tracey, this is just too stinking cute!
ReplyDeleteClever stencilling, Tracey ... subtle and perfect for this cute little shaker and sweet bee! Hugs, Anita :)
ReplyDelete